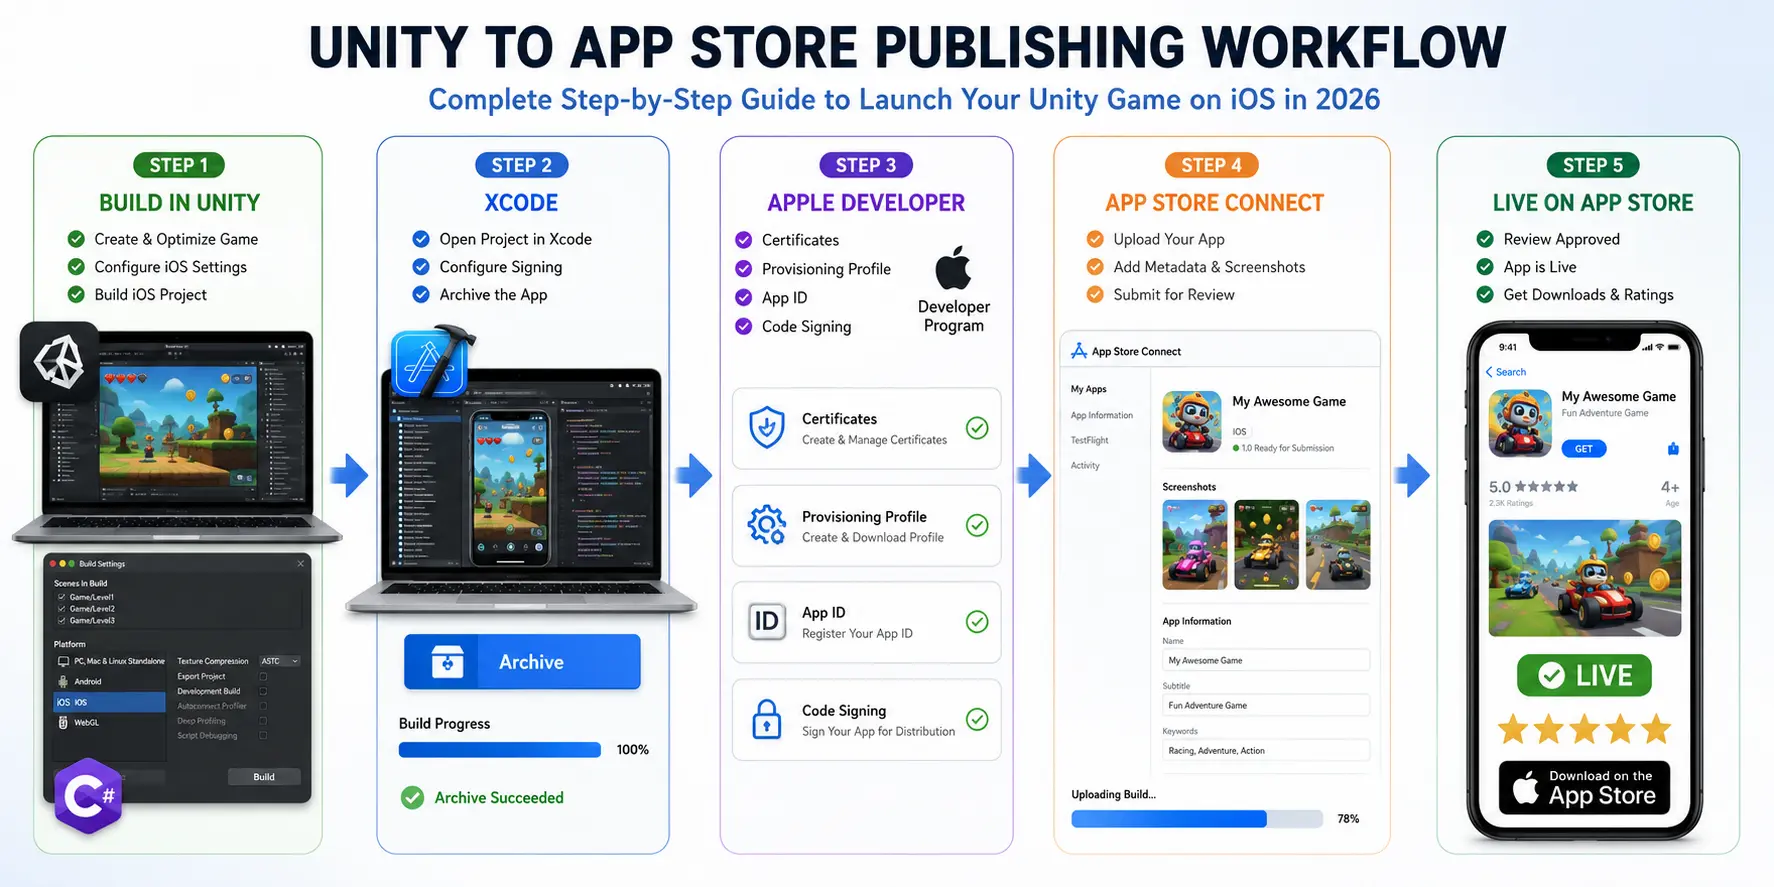
Launching a Unity game on iOS in 2026 is more accessible than ever, but it still trips up first-time developers who don't know the exact sequence of settings, certificates, and App Store requirements. Whether you're building an original title or working with a ready-made Unity game template, this guide walks you through every step — from configuring your Unity project to submitting your build to App Store Connect — so you can publish your Unity iOS game without the usual guesswork.
This complete Unity to iOS deployment guide covers Unity build settings, Xcode configuration, code signing, App Store submission, monetization setup, and post-launch optimization. By the end, you'll have a clear, repeatable workflow for shipping Unity games to the App Store in 2026.
Unity remains the dominant engine for mobile game development, and for good reason. It offers a mature iOS build pipeline, native Metal graphics API support, robust IL2CPP scripting backend performance, and a massive Asset Store ecosystem. For indie developers and small studios, Unity also makes it realistic to launch a polished game without a huge budget — especially when you start from a proven foundation instead of building everything from scratch.
If you're short on time or experience, many developers now skip the earliest prototyping phase entirely by starting from a pre-built game. Browsing a library of top hyper-casual Unity game source codes for 2026 is a smart way to see what genres are trending and which mechanics already have proven App Store performance before you commit months of development time.
Before you touch Xcode, your Unity project needs to be properly configured for iOS export.
Open Unity Hub, select your Unity Editor version, and add the iOS Build Support module if it isn't already installed. Unity 6.x LTS is the recommended version for 2026 projects, offering the most stable IL2CPP and Metal rendering performance for mobile titles.
Go to Edit > Project Settings > Player and configure the following for the iOS tab:
Fill in your app icons for all required resolutions, set your launch screen, and lock the orientation your game is designed for (portrait for most hyper-casual and puzzle titles, landscape for action or racing games).
You'll need an active Apple Developer Program membership ($99/year) tied to the account you'll use in Xcode and App Store Connect.
In most 2026 workflows, Xcode's Automatic Signing handles this for you: sign in with your Apple ID in Xcode's Accounts preferences, select your Team under Signing & Capabilities, and let Xcode generate the development and distribution certificates and provisioning profiles automatically. Manual signing is still available for teams managing certificates centrally across multiple developers.
If your game uses the camera, microphone, location services, ad tracking, or push notifications, you must add usage description strings (e.g., NSCameraUsageDescription) to your Info.plist, or Apple will reject the build during review. Unity lets you inject these directly from Player Settings under Other Settings.
If you're running ads through networks like AdMob, Unity Ads, or IronSource, you must implement the App Tracking Transparency prompt. This is mandatory for any app that requests the IDFA for ad targeting or attribution. Get this wrong and your app can be rejected outright, so test the ATT flow thoroughly on a physical device before submission.
With your project configured, it's time to generate the native iOS project:
Unity will compile your C# scripts to native code via IL2CPP and generate a complete Xcode project (Unity-iPhone.xcodeproj) in your chosen folder. This process can take anywhere from a few minutes to over an hour depending on project size, especially on the first build.
Important: You need a Mac running macOS to complete this step, since Xcode only runs on Apple hardware. If you're developing on Windows, you can still create and edit the Xcode project files remotely, but you'll need access to a Mac (physical or cloud-based, such as Unity's Build Automation service) to actually compile and submit the final build.
Once the Xcode project opens:
Once archiving completes, the Xcode Organizer window opens automatically, showing your build ready for distribution.
Never submit a build to Apple without testing it on physical hardware. Simulator testing misses real-world issues like touch responsiveness, frame rate on older devices, memory pressure, and ad SDK behavior. Connect an iPhone or iPad, select it as the run destination in Xcode, and play through your entire game loop — including ad placements, in-app purchases, and any permission prompts.
If your game monetizes through ads, this is also the point where you should verify your ad integration end-to-end. If you haven't set this up yet, this walkthrough on how to integrate AdMob into a Unity game template covers the SDK setup, mediation configuration, and common iOS-specific pitfalls like ATT permission timing and ad unit ID mismatches.
While your build is compiling or being tested, set up the app listing itself:
Apple's keyword field (100 characters) directly affects App Store search ranking, so research relevant terms in your genre before finalizing this — it's essentially App Store SEO and deserves the same attention as your game's actual gameplay loop.
From Xcode's Organizer window, click Distribute App, select App Store Connect, then Upload. Xcode validates the build, checks entitlements and Info.plist compliance, and uploads it to App Store Connect. This typically takes 10–30 minutes, after which the build appears in the TestFlight and Build sections of your app in App Store Connect (processing can take an additional 15–60 minutes on Apple's end).
Before submitting for review, distribute your build through TestFlight to internal or external testers. This catches crashes, ad-related issues, and device-specific bugs that only surface with real users on varied hardware — far cheaper than discovering them after a rejected or buggy public launch.
Once your build is processed and your listing is complete:
Apple's review process in 2026 typically takes 24–48 hours, though it can vary. Common rejection reasons for Unity games include missing ATT prompts, broken ad implementations, incomplete metadata, crashes on specific devices, and privacy label mismatches — so double-check each of these before submitting.
Getting your build approved is only half the job — you need a monetization plan that actually generates revenue. Most successful hyper-casual and casual Unity titles on iOS combine rewarded video ads, interstitials, and light in-app purchases. If you're publishing a reskinned template rather than a fully original game, it's worth understanding realistic revenue expectations first. This breakdown of how much you can earn selling a reskinned Unity game is a useful reality check before you invest in ad campaigns or influencer marketing around launch.
iOS users expect smooth 60fps performance even on mid-range devices. Before and after launch, keep an eye on:
Poor performance is one of the fastest ways to tank your App Store rating, so treat optimization as part of the launch checklist, not an afterthought.
Building a Unity game from absolute zero is time-consuming, especially for solo developers or small teams working toward a fast iOS launch. That's why so many developers now start from a tested, market-validated foundation instead. Browsing Unity Source Code's full product catalog or the broader games category gives you a shortcut: proven mechanics, clean codebases, and monetization already wired in, so you can focus your time on polish, ASO, and marketing instead of core systems.
A few examples worth looking at if you're deciding what kind of game to launch next:
Each of these templates already includes the Unity project structure needed for iOS export, which means you can move straight to the build and submission steps covered in this guide rather than spending weeks on prototyping.
For budget-conscious indie teams, it's also worth understanding the broader case for starting with a template rather than building from scratch. This article on how budget Unity templates help indie developers breaks down the cost and time savings in more detail, which is especially relevant if you're planning to launch multiple titles on iOS throughout the year rather than a single game.
Once your game is live on the App Store, the work isn't over:
Do I need a Mac to launch a Unity game on iOS?
Yes. Xcode only runs on macOS, so you need access to a physical Mac or a cloud-based Mac service (such as Unity's Build Automation) to compile, sign, and submit your final iOS build, even if you develop the rest of your game on Windows.
How much does it cost to publish a Unity game on the App Store?
The main mandatory cost is the Apple Developer Program membership at $99/year. Beyond that, costs depend on your game — art, ad networks, and any paid Unity assets or templates you use — but there's no separate per-app submission fee.
How long does Apple's App Review take in 2026?
Most builds are reviewed within 24–48 hours, though it can take longer during high-volume periods or if your app is flagged for manual review. Submitting a clean, well-tested build with accurate metadata reduces the chance of delays or rejection.
Why was my Unity iOS app rejected?
The most common reasons are a missing App Tracking Transparency prompt, broken or misconfigured ad SDKs, incomplete App Privacy disclosures, crashes on specific devices, or outdated Xcode/SDK versions. Testing on a real device and reviewing Apple's latest guidelines before submission avoids most of these issues.
Can I launch a reskinned Unity template on iOS?
Yes, reskinning a proven Unity template is a common and legitimate way to launch on iOS faster. The same build and submission process applies — just make sure your reskin is meaningfully differentiated in art, branding, and store listing to stand out and avoid App Store duplication flags.
Which scripting backend does Apple require for Unity iOS builds?
Apple requires the IL2CPP scripting backend for all App Store submissions; the older Mono backend is not accepted. Unity uses IL2CPP by default for iOS in current versions.
Do I need App Tracking Transparency (ATT) if I use ads?
Yes, if your app requests the device's IDFA for ad targeting or attribution — which most ad networks and mediation platforms do — you must implement the ATT permission prompt, or your app risks rejection and significantly reduced ad revenue.
How do I improve my Unity iOS game's App Store ranking?
Focus on App Store SEO: research and use relevant terms in your 100-character keyword field, write a clear description with your primary keywords early, use compelling screenshots and a preview video, and encourage early reviews — all of which influence organic search ranking and conversion rate.
Launching a Unity game on iOS in 2026 comes down to a repeatable pipeline: configure your Unity project correctly, build a clean Xcode archive, handle signing and privacy requirements properly, test thoroughly on real devices, and submit with a complete, accurate App Store listing. Whether you're publishing an original concept or a reskinned template, the technical steps are the same — what changes is how much time you spend building the game itself versus polishing and marketing it.
If you want to skip months of development and go straight to build, test, and launch, explore the full Unity Source Code for ready-to-publish game templates, or head straight to the products page to find your next iOS release.



